Why Custom Fonts Matter
Custom fonts allow you to infuse your website with personality, helping you communicate your brand’s identity effectively. Showit offers a range of built-in fonts, but custom fonts can give your site a distinct look and feel that aligns with your brand.
Step 1: Choosing Your Custom Fonts
Before you can add custom fonts to your Showit website, you need to select the fonts that best represent your brand. Here’s how to do it:
1. Browse Font Websites: Start by exploring font websites like Google Fonts, Adobe Fonts, or myfonts.com. These platforms offer a vast collection of fonts that you can use on your website.
2.Pick Fonts That Match Your Brand: Consider your brand’s personality and target audience. Choose fonts that align with your brand’s values and the message you want to convey.
3. License Fonts: When you find fonts you like, make sure to check the licensing terms. Some fonts are free for personal and commercial use, while others may require a purchase or subscription.
4. Download the Fonts: Once you’ve selected your fonts, purchase and download them to your computer. You will need to purchase a web license in .woff format.
Step 2: Uploading Custom Fonts to Showit
Now that you’ve chosen your custom fonts, it’s time to upload them to Showit. Follow these steps:
1. Access Your Site: Open your Showit website in the Showit app.
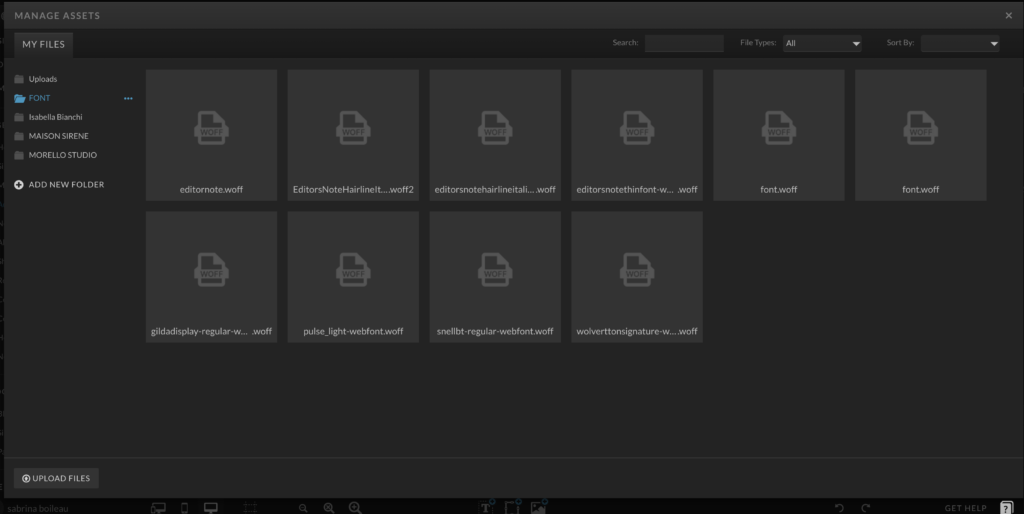
2.Add a Font: Click on “Media Library” in the left-hand menu. Create a folder called “Fonts” (optional, but helps keep all fonts organized).

3. Upload Your Custom Fonts: Drag and drop or upload the downloaded .woff font file from your computer into the “Fonts” folder in the Media Library. Close the Media Library once the font is uploaded.

Step 3: Add the Font to Your Showit Website
1. Access Design Settings: Click on the “Design” tab on the left sidebar.
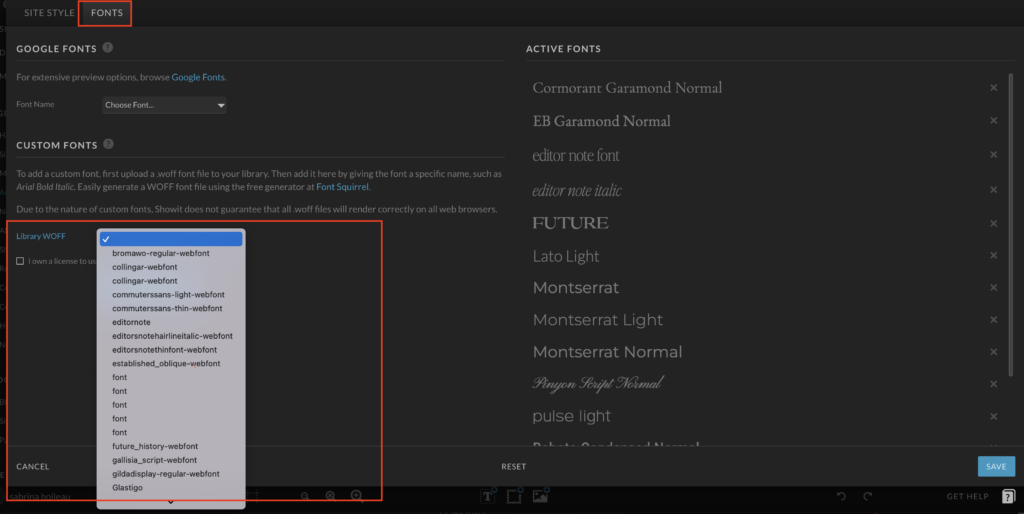
2.Fonts: In the Design Settings, select the “Fonts” tab

3. Upload Your Custom Fonts: Under “Custom Fonts,” you’ll see a dropdown menu for “Woff Library.” Click on it and select the custom fonts you upload in Step 2.
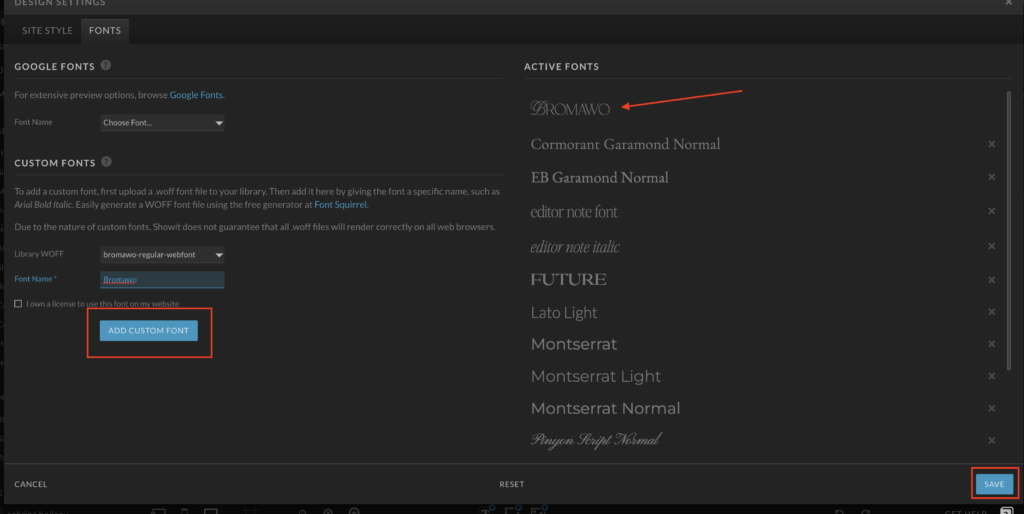
4.Name Your Fonts: Give your custom fonts a clear and descriptive name to easily identify them in your font list.
5.Add Custom Font: Click the “Add Custom Font” button. The font will now show up in the active fonts section on the right side. Repeat the process for any other custom fonts you’ve uploaded.

7. Save Changes: Click the “Save” button to add the custom fonts to your Showit website and close the Design Settings.
Step 3: Applying Custom Fonts to Your Website
With your custom fonts now available in Showit, it’s time to apply them to your website’s design:
1. Select a Text Element: Click on any text element on your web page to bring up the text editor.
2. Choose a Font: In the text editor, open the “Font” dropdown menu. You will see your custom fonts listed there alongside Showit’s default fonts.
3. Apply Your Custom Font: Select your custom font from the list, and it will instantly be applied to the text element.
4. Adjust Styling: You can also adjust the font size, style, color, and other text properties to match your design preferences.
5. Preview Your Changes: Always preview your changes to ensure your custom fonts are rendering correctly on your website.
Wrapping Up
Adding and choosing custom fonts in Showit can significantly enhance your website’s visual appeal and branding. It’s a simple process that can make a big difference in how your site communicates your brand’s identity. As a beginner, take your time experimenting with different fonts until you find the perfect combination that complements your website’s design. Showit’s user-friendly interface makes it accessible for web design beginners to create a beautiful and uniquely styled website.
Leave a Reply Cancel reply
Read the latest
© Your site here 2023. All Rights Reserved.
Site Credit
Lorem Ipsum is simply dummy text of the printing and typesetting industry.
Connect with us.
BACK TO THE TOP


